I have a large batch of iPhone Live Photos that I want to convert into regular still images, but I’m worried about losing image quality in the process. I need help finding the best way to save or export them as standard photos while keeping the original resolution and clarity.
Live Photos felt neat to me for about a week. After that, they turned into clutter. They eat more storage than a plain photo, but they still don’t replace a normal video. So I ended up treating them like a bad middle ground. If you want a still, take a photo. If you want motion, shoot a video.
The part I missed at first was how easy it is to build up a pile of them. You leave Live Photo on once, forget about it, and a few months later your library is full of little motion clips you never meant to save. The upside is simple. You do not need to throw them away. You can pull out the still frame and keep it as a regular image.
TL;DR
If you only need to fix a handful, use the Photos app and pick Duplicate as Still Photo. If you want to stay inside Apple’s stuff and don’t mind setting up a shortcut, Shortcuts works fine. If your library is a mess with hundreds or more, Clever Cleaner is the quickest route because it handles the conversion and the follow-up cleanup in one pass.
1. Duplicate as Still Photo
Best for: small batches.
What happens: The Photos app makes a separate regular image from the still frame inside the Live Photo. Your original Live Photo stays where it is. I liked this for spot-checking a few shots first, since you get the new still without touching the original yet. The catch is obvious. Storage does not go down until you delete the Live Photo version yourself.
Steps:
- Open Photos and go to Media Types > Live Photos.
- Tap Select.
- Choose the Live Photos you want.
- Tap the three-dot menu.
- Tap Duplicate.
- Choose Duplicate as Still Photo.
Keep this in mind: this makes a second file. It does not replace the old one. If your goal is storage cleanup, delete the original Live Photos after checking the still copies, then empty Recently Deleted. If you forget that last part, the files sit there for 30 days. I did that once and wondered why my storage number barely moved. dumb mistake.
2. Cleaner apps
Best for: big libraries, especially when you have far too many Live Photos to handle one by one.
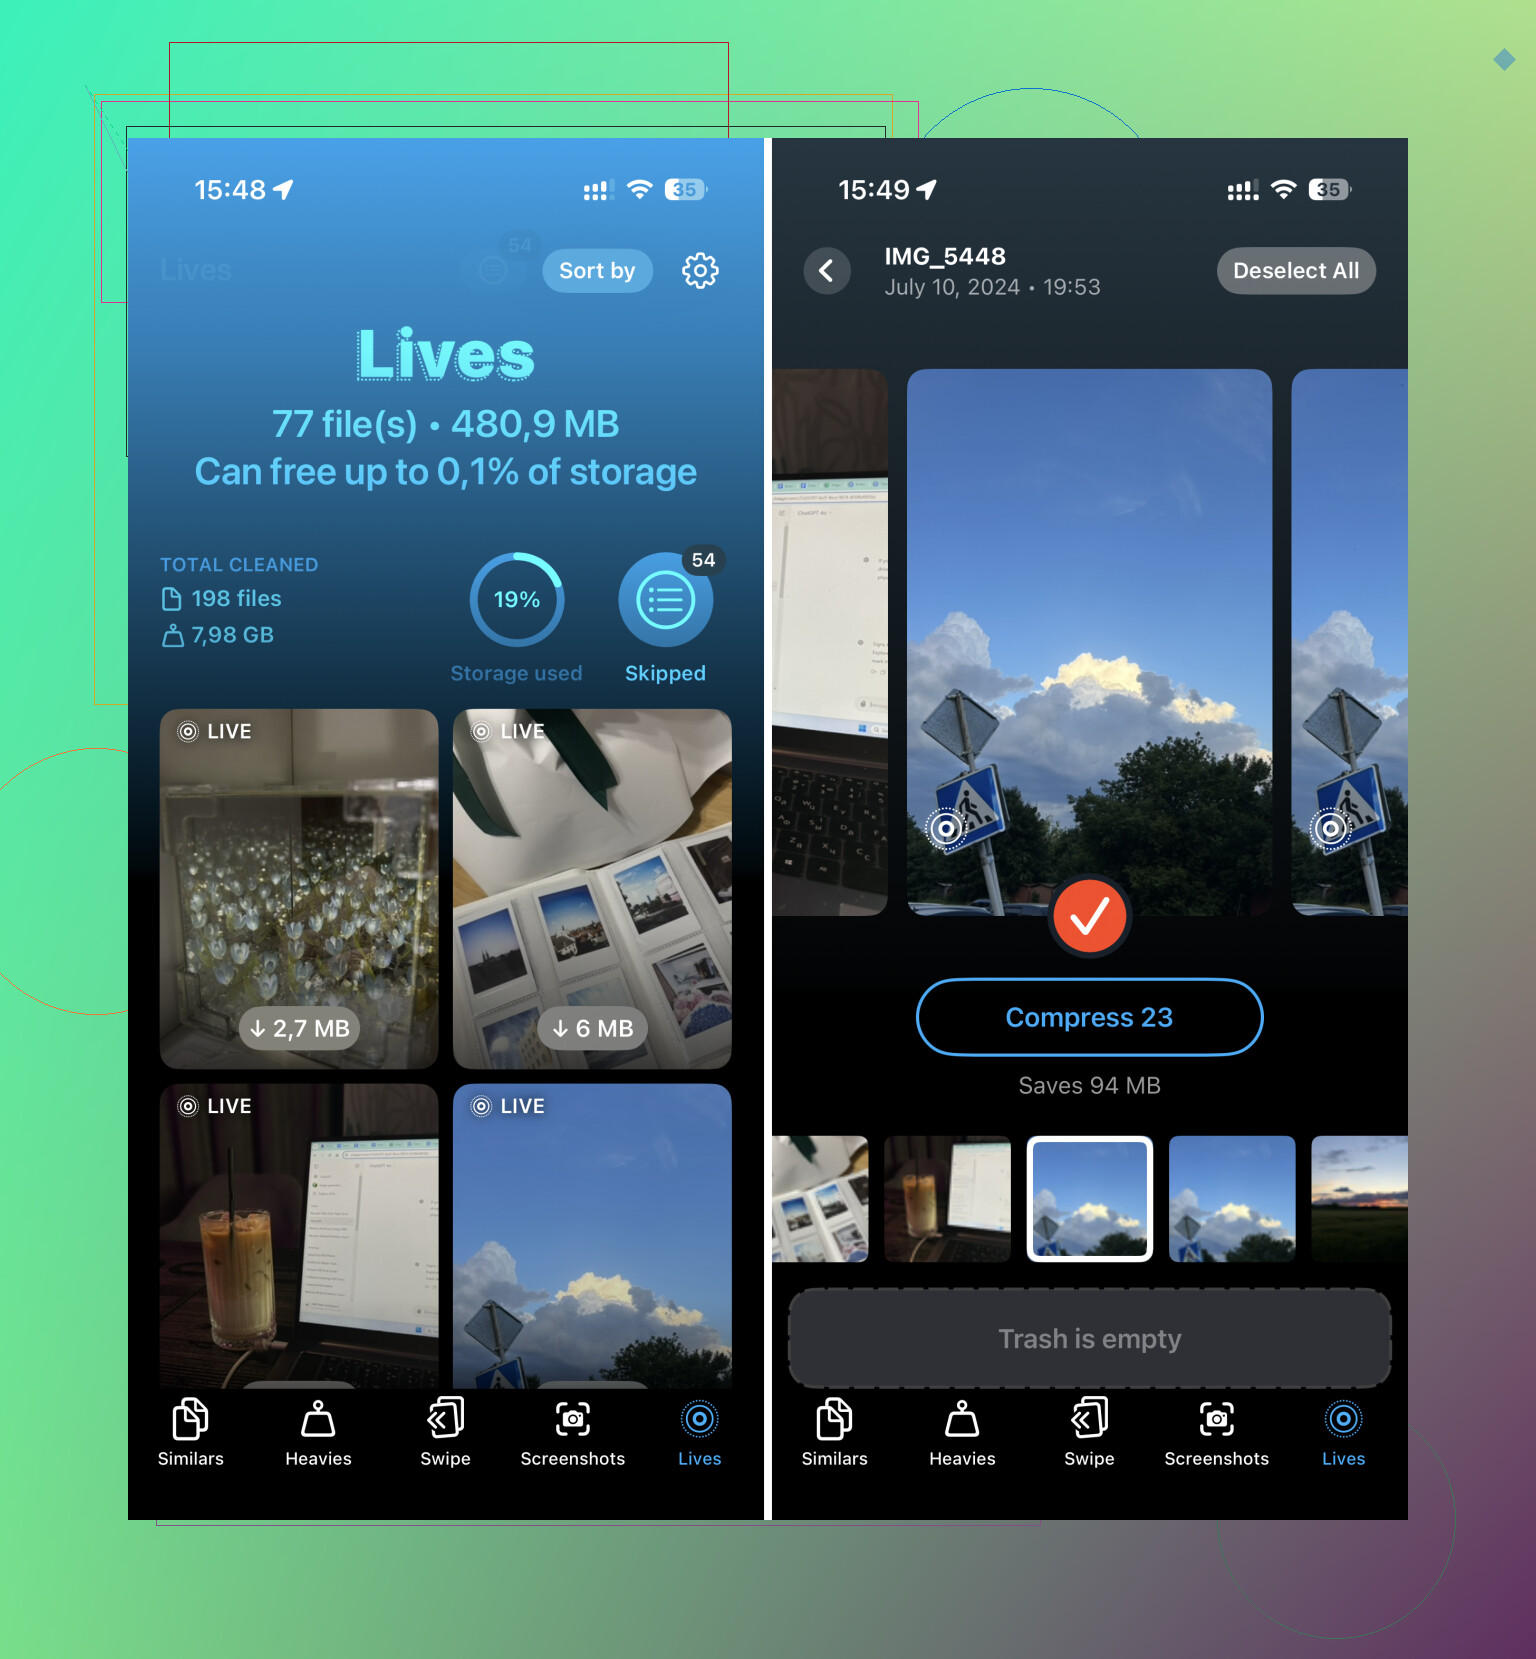
What happens: Clever Cleaner has a section for Live Photos, which is the part I would care about if the goal is speed. It scans them, shows which ones are taking up the most room, and lets you turn them into still images in bulk. The useful bit is the cleanup after conversion. You are not bouncing back and forth between tools trying to finish the job by hand.
Steps:
- Open Clever Cleaner.
- Go to the Lives section.
- Sort by date or file size.
- Tap Select All if you want to process the whole set.
- Tap Compress.
- Check the amount of storage shown for recovery.
- Pick whether to remove the original moving files or leave them in the app’s trash first.
Keep this in mind: the button says Compress, but what matters is the result. It removes the motion part and leaves the still image behind at high quality. If your aim is to convert and reclaim space without babysitting every file, this is the fastest way I found.
3. Shortcuts app
Best for: people who want an Apple-only setup and do not mind a few minutes of configuration.
What happens: Shortcuts lets you automate the boring part. You tell it to find Live Photos, convert them into regular image files, and save those back to your library. It is more flexible than the built-in duplicate tool. It is also more fiddly. And yes, you still have to remove the original Live Photos yourself afterward.
Steps:
- Open Shortcuts and create a new shortcut with the + button.
- Add Find Photos.
- Set the filter to Photo Type is Live Photo.
- Add Repeat with Each.
- Inside the loop, add Convert Image and choose JPEG or HEIF.
- Add Save to Photo Album.
- Run the shortcut.
Keep this in mind: Shortcuts saves the still copies, then stops. It does not clean up the original Live Photos for you. So after it finishes, go back into your Live Photos album and delete the moving versions manualy.
After you finish the cleanup, turn Live Photo off so you do not end up here again in six months. Open the Camera app and disable Live Photo. Then go to Settings > Camera > Preserve Settings > Live Photo and make sure it is enabled. If you skip this, the phone tends to drift back into old habits and start saving Live Photos again.
4 Likes
If your goal is zero quality loss, do not export through screenshots, messaging apps, or social apps. Those often recompress the image. That’s where people mess it up.
One thing I’d add to what @mikeappsreviewer said, I would not lean on JPEG conversion unless you need max compatibility. If the original still frame is HEIC, keep it in HEIC. Smaller file, same image data in most cases.
Best quality workflow for big batches:
- Move Live Photos to a Mac with Image Capture or Photos.
- Export the original still frame as unmodified original, or export HEIC at full size.
- If you need JPGs for Windows or websites, convert copies later, not your main archive.
If you want this done on iPhone and want less manual sorting, Clever Cleaner is decent for bulk Live Photo cleanup. It also helps you remove duplicate shots, large videos, and other storage hogs after the conversion, which is faster than poking around Photos for an hour.
If you want a visual walkthrough, this video is solid:
watch how to clean up iPhone storage and Live Photos faster
Small tip people miss, pick the Key Photo first if the auto-picked frame looks bad. Then save the still from that frame. Saves a lot of annoyng rework later.
I’d add one angle that @mikeappsreviewer and @caminantenocturno only touched on a little: if you care about zero quality loss, the safest move is to keep the still in its original format and avoid any workflow that says “convert” unless you actually need another format.
A Live Photo is basically a still image plus a short motion clip. The still part is already there. So the goal is not really “improve” it, just extract or preserve that key frame without recompressing it.
What I usually do for large batches:
- first, review a few Live Photos and set the Key Photo manually if Apple picked a dumb frame
- then export/save the stills in HEIC if you want max quality and smaller files
- only make JPEG copies later if a site/app forces you to
On Mac, that tends to be more reliable for mass handling than doing everything on the phone. Honestly, for giant libraries I slightly disagree with the “just use Photos duplication” idea because it gets tedious fast.
If you want iPhone-only bulk cleanup, Clever Cleaner is practical because it cuts down the motion part and helps with storage cleanup after. It’s basically an iPhone cleaning app for removing duplicate photos, large videos, and storage-heavy Live Photos without a ton of manual work.
Also worth reading: smart ways to clean up iPhone storage and Live Photos
Biggest mistake people make: sending the photo through Messages, WhatsApp, or email to “save it” as a still. That’s where quality gets trashed real fast.
I mostly agree with @caminantenocturno, @viajeroceleste, and @mikeappsreviewer on one key point: the image quality is usually lost during export, not because Live Photo itself is low quality.
One thing I’d push back on a little: “convert” is not always the right mindset. If you can, extract the embedded still instead of transcoding it. That matters because any JPEG re-save can introduce generation loss.
A less talked-about option for big batches is using Mac Finder/Image Capture to pull the originals straight off the phone, then separating assets later. That avoids some of the weirdness Photos app introduces with duplicates and library syncing. If your archive matters, I’d trust a file-based workflow more than an iPhone-only one.
My rule:
- archive master stills as HEIC if that was the original
- make JPEG derivatives only for sharing/compatibility
- do not use AirDrop-to-app, chat apps, screenshots, or “Save from message”
If you want iPhone-only cleanup, Clever Cleaner is fine for bulk Live Photo management.
Pros of Clever Cleaner
- fast for large libraries
- easier to spot storage-heavy Live Photos
- also helps clean duplicates and large videos
Cons of Clever Cleaner
- less transparent than a manual export workflow
- not my first pick for archival preservation
- app-based cleanup can make it easier to delete too much too fast
So for best quality, I’d still rank it like this:
- Mac export of originals
- Apple Photos duplicate/export in original format
- Clever Cleaner for speed when storage cleanup matters more than perfect archival handling
Also, before batch-saving anything, manually set the Key Photo on a few important Live Photos. That choice affects whether the still you keep is actually the frame you want.